Sunday, July 29, 2012

DIY Wall Art

Cheap and Easy! (Mostly.)

So, in this picture, it's rather dull looking. But in person, this wall art is really neat! The one on the left has sheet music in the letters, and the one on the right has itty-bitty song lyrics. Here's how to make your own wall art like this!

Supplies:
Canvas (or quark - see below.)
Scissors or exact-o knife
Acrylic paint of your choosing
Paint brush
Glue stick
Mod-podge (optional)
Vinyl lettering (optional)

1. If you have a canvas, you can skip this step.
Get a large quark board. Trace a sheet of printer paper onto it, then saw out your shape. I'm doing two pieces of art, so I cut two pieces.


  2. Print out two sheets of paper: one that will act as the filling to your words, and one with the actual words. (Here, I have sets for each board. I used the font "elephant" at size 96)

3. Glue you background to your board. I would suggest using mod-podge here, but if you're broke like me, a glue stick will suffice. Make sure you coat it well.
4. Now, start carefully cutting out each letter! I broke my exact-o knife, so I'm stuck using scissors, but if you have an exact-o knife, I would highly suggest using it.
5. Glue the letters onto your board in the order you want them to be. Don't glue these heavily! Just barely place them there, as you'll be taking them off later. The vinyl letterings you can buy at wal-mart or target would be a good alternative here.
6. Start painting your board. Cover the entire thing, being careful not to get paint underneath the letters you just glued down.


7. While the paint is still drying, ever so CAREFULLY start pulling up those letters.


8. After the paint has dried, flip the board over and place a nail in the top of it, slanting upwards. Then slip a paperclip onto it; this will act as a hook to hang your art.

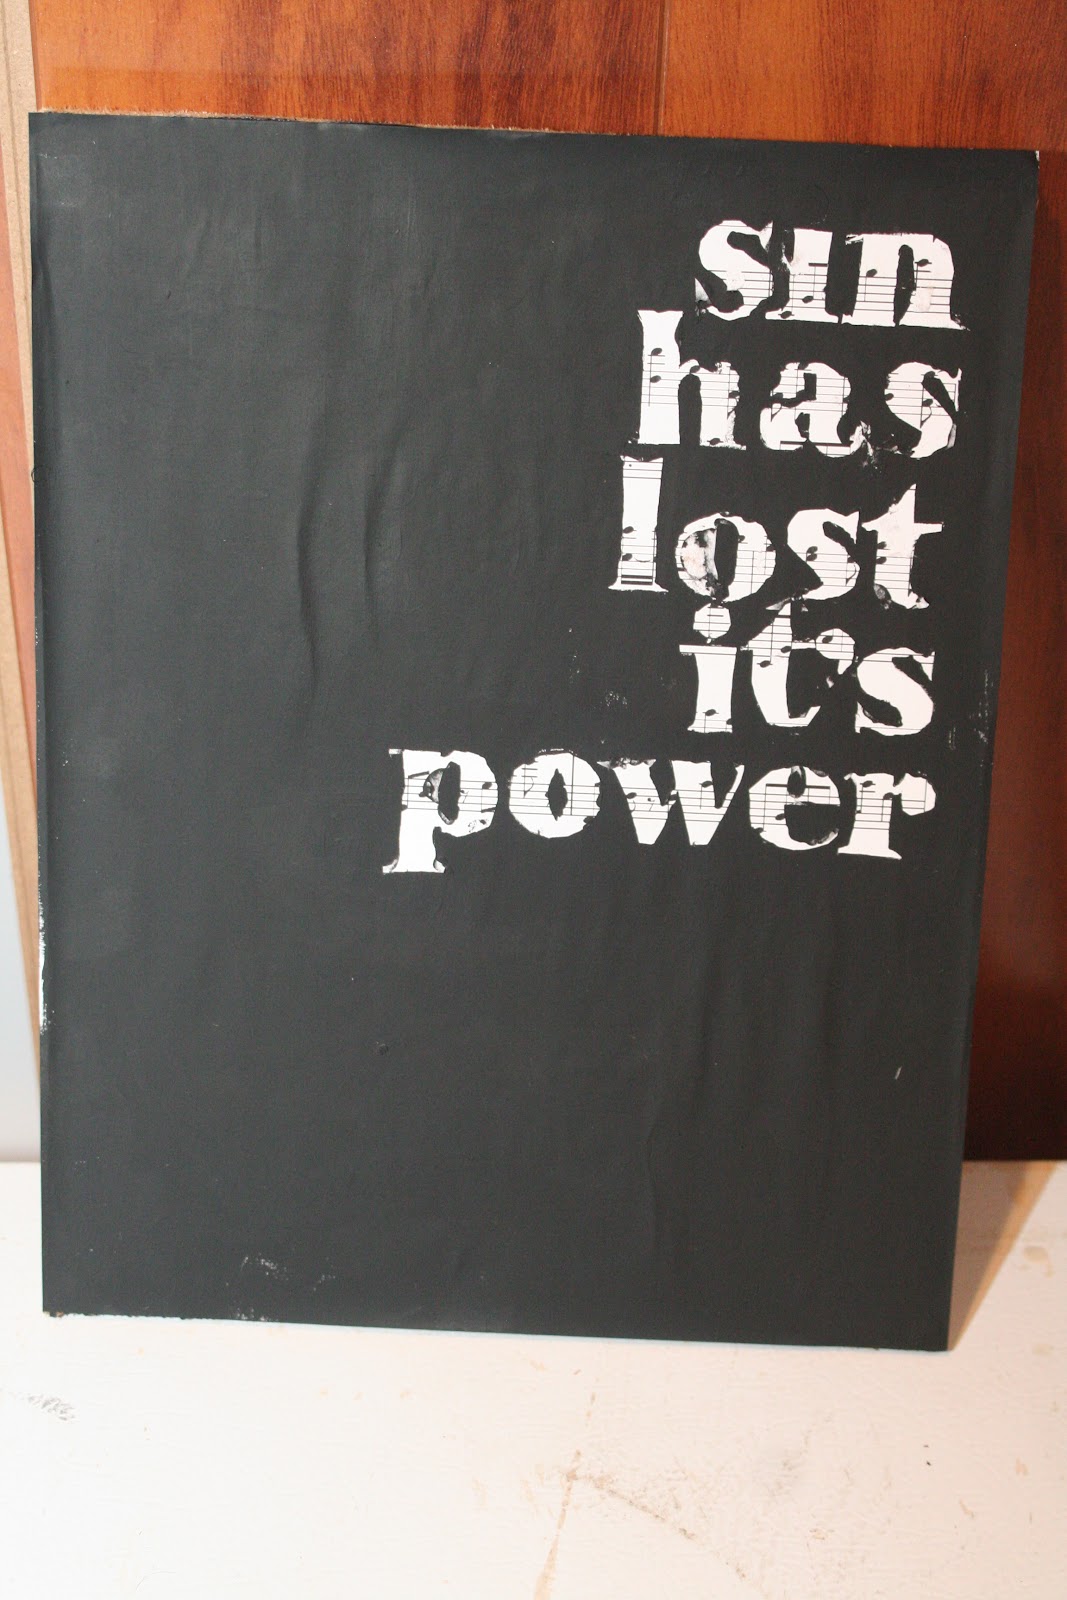
And you're done! In the end, you should have a final product that looks something like this:


You can try this with so many variations! Magazines, maps, sheet music, book pages as back drops? The possibilities are endless. Make it yours.
Hope you enjoyed this tutorial!

Saturday, July 28, 2012

Staying Motivated

Motivation

One of the hardest parts of running for me is the fact that I get bored! There's just something about running that makes my mind wander to how tired I am, and how sore I am, and how nice it would feel to walk. And then I start slacking, and that's not good! So these are tips and tricks to stay motivated while running.

1. Audio Books
I don't know about you, but running with music just does not hold my interest. I'm always stopping to change the song, or I've heard the song too many times and I don't pay attention to it. Anyway, music just doesn't cut it. So, I went to Audible and downloaded some audio books and put them on my iPod! This way, I can stay entertained while I run.

2. Change Your Scenery
If you run the same path every time, it's going to get real old real fast. Try mixing it up!

3. Buddy System
Run with a friend! If you have a friend running with you, you're less likely to stop when you get tired. You're accountable to the other person, so you have to stay running so that they don't slack off either. 

4. Music
If the audio book option doesn't appeal to you, go ahead and get a running playlist! Try songs like:
Falling Down - Atreyu
Everybody Talks - Neon Trees
Blackout - Breathe Carolina
Lights - Ellie Goulding
Drive By - Train
I Can't Stand to Fall - Philmont
How Far We've Come - Matchbox Twenty
Set Fire to the Rain - Adele
Those are just a few that I've used!

I hope this helps you! And also, stay hydrated! It's very important that you get enough liquids in you before/after you run, especially if you're running outside!
Stay strong! :)

Get fit!

It's time for you to get fit.

I'm not one of those girls who can eat whatever she wants and not exercise and still stay a size 4. Not in the slightest. While it is true that I eat enough to feed a small family, I learned the hard way that I need to exercise. Over the course of 1 year, I lost 40 pounds and went from a size 12 to a size 2-4, depending on what I'm wearing. I gained muscles everywhere, especially in my thighs and abs. I toned up. So, you can't tell me that I don't know how hard it is to lose weight or get motivated. I've been there! Now it's your turn. 


Here is a basic workout routine. This is what I do 4 days a week (Mon, Tues, Thurs, and Fri.) Depending on how fast you run, and how many breaks you take, this can take anywhere from 30 minutes to an hour. It's up to you. Feel free to tweak it to your liking!

  1. One-mile run. Do this wherever you please. Normally, I run mine around a soccer field (a little over 5 laps,) but you can do this on the treadmill, at a local Green-way, through your neighborhood... wherever you like! 
  2. Sit ups! For me, the best muscle to tone is my abs. My goal is to have a visible six-pack by the end of this season. And sit ups will help with that! Do 3 or 4 reps of 35 sit-ups.  (Collectively, you'll do 105-140 sit ups.)
  3. Flutter Kicks. Ah, flutter kicks. I hate these with a passion, but they have to be done. Some of you may not know what flutter kicks are, so let me explain:
    Lay flat on your back, hands under your lower back/butt to avoid discomfort. Raise both legs so that your feet are about 6 inches off the ground. Now raise your right leg up high, pointing you toes, while keeping your left leg 6 inches off the ground. Now bring your left leg up, and your right leg down. Don't let your right leg touch the ground! Keep it at 6 inches. Then bring your right leg back up, and your left leg back down. That's one. Your feet never touch the ground, until you're done. An easy way to count it off is to say "One, two, three, ONE! one, two, three, TWO!" Each "one, two, three" being when you raise your leg.
    Do 2 reps of 20.
  4. Squats. Work that booty. Squats are relatively easy. Place your feet a little more than shoulder-width apart, and squat down until your knees are parallel with your feet. Don't let your knees go past your toes! This is bad for your knees, and can lead to injury. Then go back up. That's one. Do 3 reps of 20.
  5. Push ups? This one is kind of subjective. I normally don't do anything to strengthen my arms, but when I do, it's just push ups. Do 3 reps of 10. 
And you're done! That wasn't too bad, right? Do this several times a week, and along with the proper diet, you'll be shedding pounds in no time. Good luck! :)

Friday, July 27, 2012

Feed your face.

Homemade Biscotti

Recently I've been really craving some biscotti.

You know, biscotti. The crunchy/hard cookie that is designed to be dunked in teas or coffees. 
So, I made some. And they were delicious. I just used pecans as a filling, but you can also add different types of chopped nuts, dried fruit, or mini chips to your liking.

Ingredients

  • 1 cup all purpose flour
  • 1 cup almond flour (or another cup of AP flour. Almond flour adds a crumbliness that I prefer.)
  • 3/4 cup sugar
  • 1  1/2 tsp. baking powder
  • 1/4 tsp. salt
  • 3 eggs
  • 2 tsp extract flavor (I used imitation coconut. You could try almond, or vanilla, or whatever you like.)
  • 1-1 1/2 cups chopped nuts (I used pecans), or 3/4 cup mini chips, or 1 cup chopped dried fruit (optional)
Preparation
Preheat oven to 350 degrees
Thoroughly combine all dry ingredients.
In a separate bowl, combine extract & eggs, whisk. 
Mix egg/extract with dry ingredients, stirring completely until you have a very stiff dough. 
Flour hands to prevent dough from sticking. Lightly flour dough.
Divide dough in half and shape 2 "logs" of equal size. Place logs on greased or parchment lined cookie sheet 4 inches apart.
Flatten the log lightly, but not too much! Bake for 20-25 min, until dough is firm to the touch.
Remove from oven.
Reduce oven heat to 325 degrees.  
 Place baked log on a cutting board and slice diagonally (1/2 inch wide pieces). Return slices to cookie sheet and bake 8-10 min. on each side or until light-golden brown. 
Store the biscotti in airtight container or cookie jar.

Now, these were great, but I felt like they needed more. So, I melted down some milk chocolate chips, and coated/drizzled each of them. Then about half of them, I covered the chocolate with pecans or coconut flakes. And here is the finished product: They were pretty fantastic, if I do say so myself.